![]()
Assume that you have 2 Linux servers, one is having zabbix-server (192.168.0.1) and another is having zabbix-agent (192.168.0.2).
In agent server
Zabbix Agent is required to install on all remote systems needs to monitor through Zabbix server. The Zabbix Agent collects resource utilization and applications data on the client system and provides such information to Zabbix server on their requests.
For Ubuntu agent:
# wget http://repo.zabbix.com/zabbix/3.2/ubuntu/pool/main/z/zabbix-release/zabbix-release_3.2-1+xenial_all.deb
# dpkg -i zabbix-release_3.2-1+xenial_all.deb
# apt-get update
# apt-get install zabbix-agent –y
After installing completed by Zabbix agent. Edit Zabbix agent configuration file /etc/zabbix/zabbix_agentd.conf and update Zabbix server IP
#Server=[zabbix server ip]
#Hostname=[Hostname of client system ]
Server=192.168.0.1
Hostname=Your hostname
After adding Zabbix server IP in the configuration file, now restart agent service using below command.
# /etc/init.d/zabbix-agent restart
** Note – make sure you have opened 10050 port on your firewall.
For CentOs agent:
# rpm -ivh http://repo.zabbix.com/zabbix/3.2/rhel/7/x86_64/zabbix-release-3.2-1.el7.noarch.rpm
# yum update
# yum install zabbix-agent
# systemctl start zabbix-agent
After installing completed by Zabbix agent. Edit Zabbix agent configuration file /etc/zabbix/zabbix_agentd.conf and update Zabbix server ip
#Server=[zabbix server ip]
#Hostname=[Hostname of client system ]
Server=192.168.0.1
Hostname=Your hostname
After adding Zabbix server IP in the configuration file, now restart agent service using below command.
# /etc/init.d/zabbix-agent restart
** Note – make sure you have opened 10050 port on your firewall.
IN the Server
Information about configured hosts in Zabbix is available in Configuration → Hosts. To add a new host, click on Create host.
IN HOST TAB:
Host name – Give Zabbix-agent hostname
Visible name – Give a Visible name of this host (Not mandatory, you can leave with blank)
Groups – Select a group
New group – Leave blank
Agent interfaces – Give the Zabbix-agent’s IP address or DNS name along with the port no. (Default is 10050)
SNMP interfaces – Leave blank
JMX interfaces – Leave blank
IPMI interfaces – Leave blank
Description – Give a description of this agent if you want.
Monitored by proxy – Select your proxy if you have any, otherwise leave (no proxy).
Enabled – checked

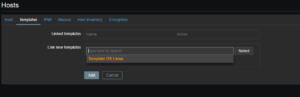
IN TEMPLATES TAB:
Link new templates – type and select your preferred template for this agent. Click on add. After clicking on add button you will see that the selected template is showing under Linked templates, for reference finds below snap.
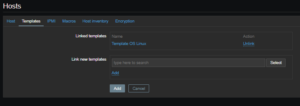
When done, click Add. Your new host should be visible on the host list and wait for a few minutes. After a few minutes, you will see ZBX green icon that’s mean all are OK.

If the ZBX icon in the Availability column is red, there is some error in communication – move your mouse cursor over it to see the error message. If that icon is grey, no status update has happened so far. Check that Zabbix server is running, and try refreshing the page later as well.
Thanks
If you face any issue regarding this, please contact me.
Source – www.zabbix.com